How to Add a Settings Page to WordPress
WordPress Settings
This article is the first in a series of articles covering WordPress Settings. Throughout the series I will cover topics including adding setting pages and admin menus, adding setting sections, basic fields and input sanitization, advanced fields, plus so much more.
Introduction
The first step to adding custom settings is creating a page to contain the settings. In the WordPress world, this page is generally called an options page. By the end of this post we will have a functioning options page along with new WordPress navigation to access the page.
Prerequisites
- Basic knowledge of WordPress themes, specifically understanding where to find the functions.php file. This is where all this code will be added.
- A development environment, preferably on your local computer, that is separate from your live website.
- A general understanding of the consequences of implementing incomplete/broken code.
Adding the Options Page
WordPress provides a built-in function called add_options_page that adds the options page for you. This function has four required and two one optional parameters that are used to generate the new page.
Parameters
$page_title
This parameter is required and is used by WordPress to display the title tags for the new options page.
$menu_title
This parameter is required and is used by WordPress as the text on the navigation item.
$capability
This parameter is required and is used by WordPress to control if the menu and page can be displayed to the user.
$menu_slug
This parameter is required and provide a unique identifier for the new page. It must be unique to any other menu item in your plugin or theme, so remeber to namespace it.
$callback
Although this parameter is normally optional, it is required for this tutorial. The value should be the name of a callable function that outputs the content for the page. I will cover this function in the next section.
$position
This parameter is optional and is used by WordPress to control the position of the new navigation item.
<?php

    add_options_page(
        __('LTDI Theme Options', 'ltdi'),
        __('LTDI Theme Options', 'ltdi'),
        'manage_options',
        'ltdi-options.php',
        'ltid_settings_page_callback'
    );
The Callback Function
The callback function is a custom function that outputs the options page content, including all settings fields we will add in the next tutorial. For this tutorial we are going to name this function ltdi_settings_page_callback.
Take a look at the name of the callback function. See how it matches the fifth parameter in the previous section. That’s how these two functions are connected together.
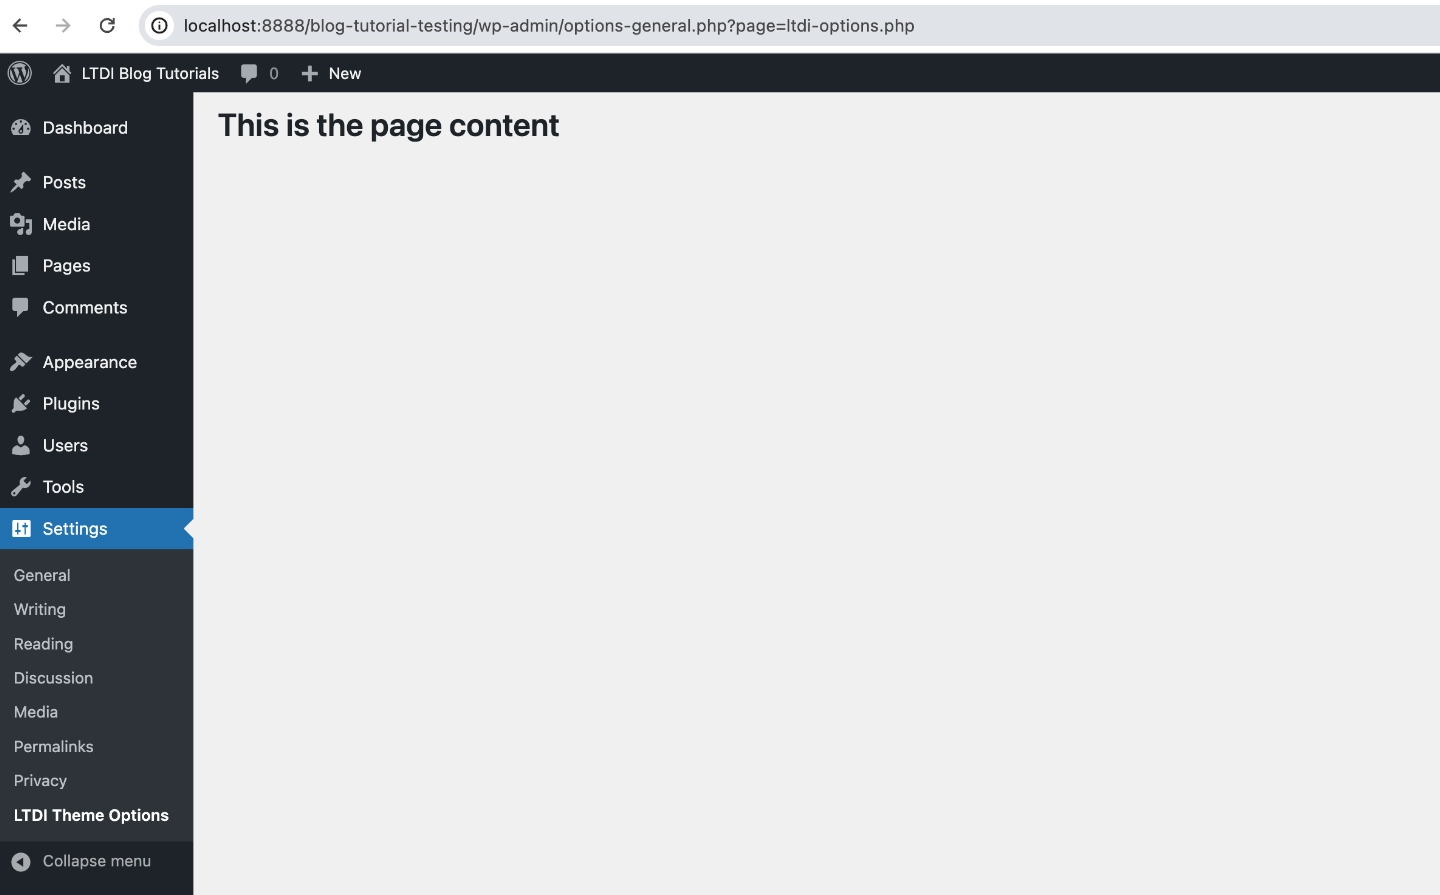
Now when the options page is viewed, it will have the text “This is the page content” displayed on it.
<?php

    function ltdi_settings_page_callback() {
        echo __('<h1>This is the page content</h1>', 'ltdi');
    }
Putting It All Together
The last step to create a settings page is connecting it to WordPress. This is done by wrapping the add_options_page function within a new custom callable function named ltid_get_settings_menu.
<?php

    function ltid_settings_page_callback() {
        echo __('<h1>This is the page content</h1>', 'ltdi');
    }

    function ltdi_get_settings_menu() {
        add_options_page(
            __('LTDI Theme Options', 'ltdi'),
            __('LTDI Theme Options', 'ltdi'),
            'manage_options',
            'ltdi-options.php',
            'ltdi_settings_page_callback'
        );
    }
After we create the ltdi_get_settings_menu function, we use the admin_menu hook to run it. In the code below this is done by using the function add_action. The first argument is the name of the hook, admin_menu, and the second argument is the name of the function to run, ltdi_get_settings_menu.
<?php

    function ltid_settings_page_callback() {
        echo __('<h1>This is the page content</h1>', 'ltdi');
    }

    function ltdi_get_settings_menu() {
        add_options_page(
            __('LTDI Theme Options', 'ltdi'),
            __('LTDI Theme Options', 'ltdi'),
            'manage_options',
            'ltdi-options.php',
            'ltid_settings_page_callback'
        );
    }
    add_action('admin_menu', 'ltdi_get_settings_menu');
When the code above is copied into your theme’s function.php file, your theme will now have a custom options page similar to the image below.
Hire Your Next Web Developer Today!